M01 - Command Line Basics + Git
Motivation
The shell is a powerful application that allows you to interact with your computer using text commands. The shell serves as a text-based interface to the operating system and allows you to perform a wide range of tasks, such as navigating the file system, running programs, and managing files.
In this module, you will learn the basics of the shell and how to use it to interact with your computer. You will also learn how to use the Git version control system to manage your code and collaborate with others.
Introduction to UNIX
This is the Unix philosophy:
- Write programs that do one thing and do it well.
- Write programs to work together.
- Write programs to handle text streams, because that is a universal interface.
Doug McIlroy
For a more comprehensive introduction to UNIX, refer to this UNIX Tutorial.
The Kernel and Shell
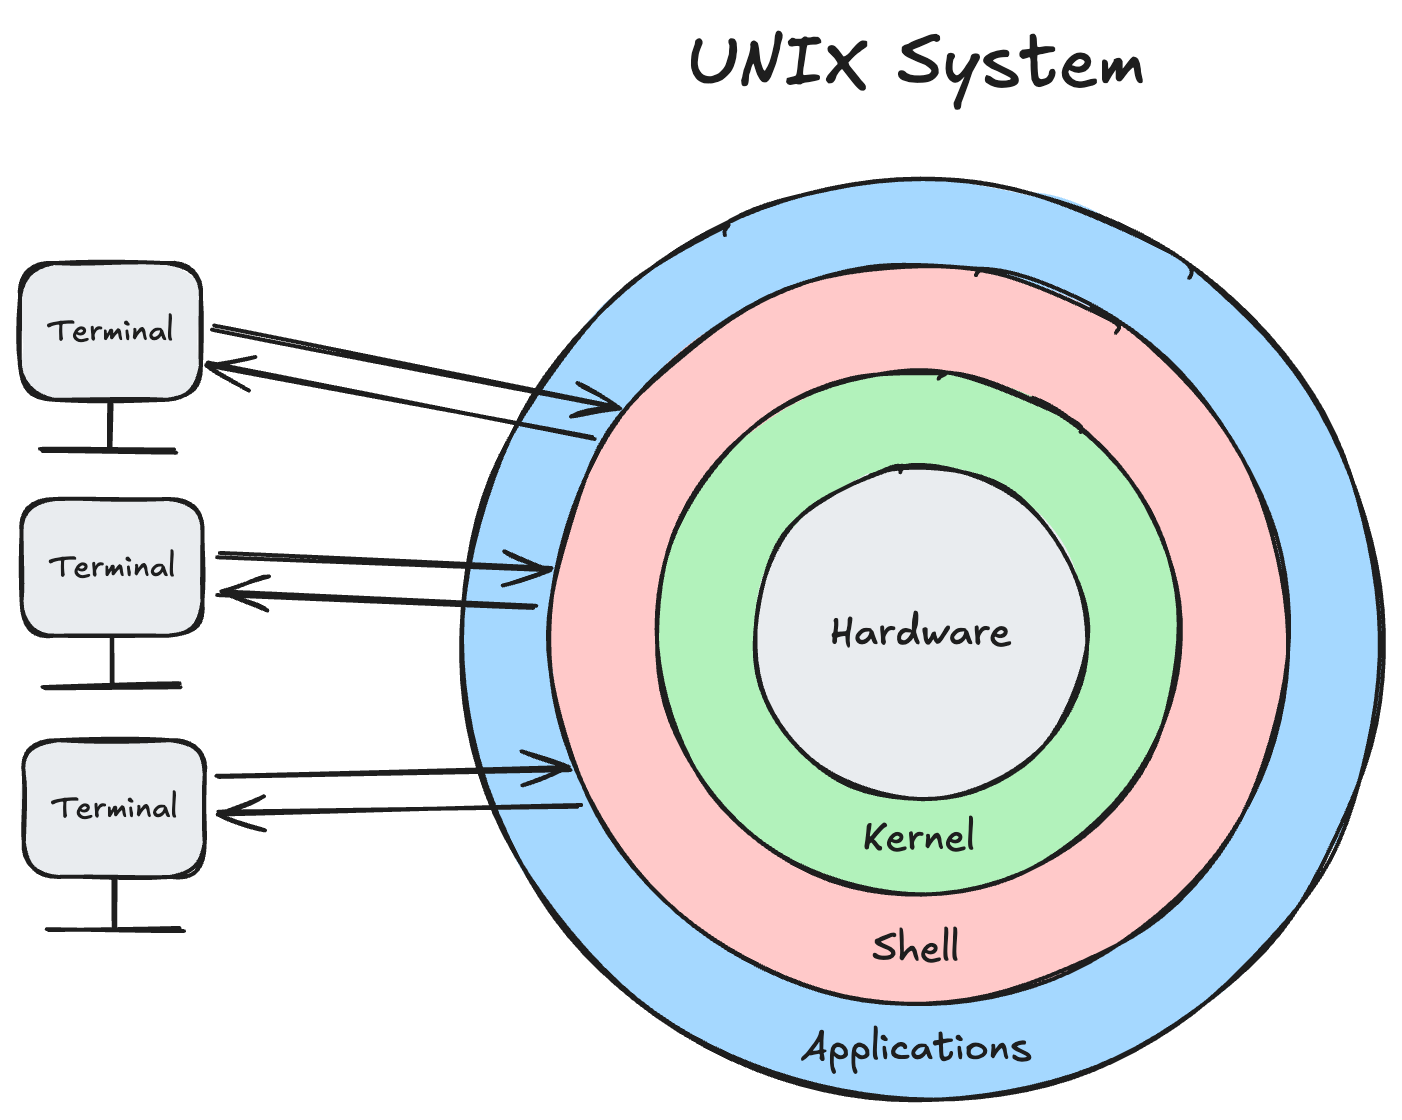
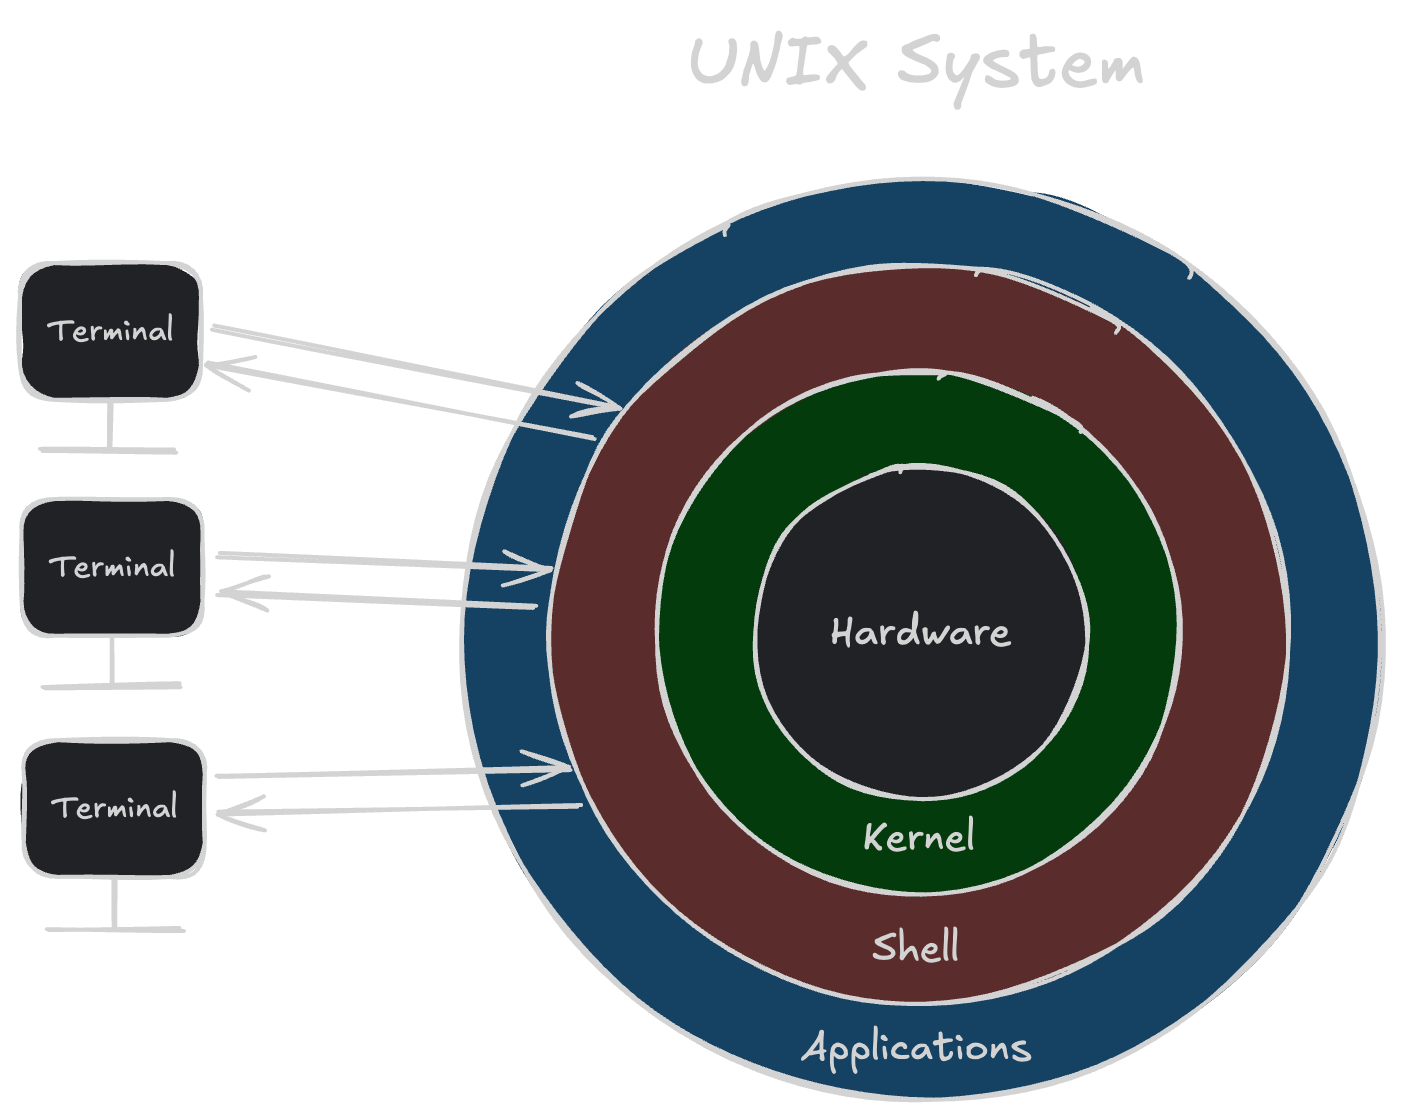
The kernel is the core component of the operating system that manages the hardware resources of the computer. The kernel provides an interface for applications to interact with the hardware, such as reading and writing files, managing memory, and handling input and output from devices.
Where the kernel provides a low-level programmatic interface to the hardware, the shell provides a high-level text-based interface to the operating system. The shell allows you to interact with the computer using text commands, which are interpreted and translated into system calls that are executed by the kernel.
Since the shell is just a program, the user must use either a terminal or terminal emulator to interact with it. Historically, terminals were physical devices that allowed users to interact with the computer using a keyboard and display. They had no processing capabilities and were responsible for displaying text output (characters, colors, cursor position, etc.) and sending keyboard input to the computer. Today, terminals are software applications that emulate the behavior of physical terminals and provide a text-based interface to the shell. Some examples of terminal emulators include Terminal on macOS, Command Prompt on Windows, and GNOME Terminal on Linux.
In summary, the shell handles computation of commands while the terminal handles display and presentation of text handed off by the shell.
We will be using the Bash shell (the Bourne Again Shell) which is used on many Unix-based systems, including Linux and macOS. Bash is a powerful and flexible shell that provides a wide range of features for interacting with the operating system.
The File System
The file system is the structure used by the operating system to organize and store files on disk. The file system provides a hierarchical view of the files and directories on the computer, allowing you to navigate and access them using the shell.
In the file system, files are organized into directories, which can contain other directories and files. Directories are organized in a tree-like structure, with the root directory at the top and subdirectories branching off from it.
When you open a shell session, you start in a specific directory called the current working directory. You can navigate the file system by changing directories, listing the contents of directories, and creating, moving, and deleting files and directories.
Command Line Basics
Now that we have a basic understanding of the shell and the file system, let's dive into some common shell commands that you can use to interact with your computer.
Navigating the File System
Where am I?
When we open a shell session, we start in a specific directory called the current working directory. You can use the pwd command to print the current working directory:
$ pwd
/home/albertgator
The output of the pwd command is the full path (ie. the absolute path) to the current working directory, starting from the root directory /. The ~ character is a shorthand for the current user's home directory (in this case, /home/albertgator).
A relative path is a path that is one that is relative to the current working directory. For example, if the current working directory is /home/albertgator it contains a directory called images, the relative path for the images directory would be images (or images/).
Listing Directory Contents
You can use the ls command to list the contents of the current directory:
$ ls
abc.txt  images  notes.txt
We can also specify one or more directories as arguments to the ls command to list the contents of those directories:
$ ls ~/images
cats.jpg  dogs.jpg  birds.jpg
For more information about the files in a directory, you can use the -l (long) option to display detailed information about each file:
$ ls -l ~/
total 8
-rw-r--r-- 1 albertgator albertgator  867 Jan  1 12:00 abc.txt
drwxr-xr-x 2 albertgator albertgator    0 Jan  1 12:00 images
-rw-r--r-- 1 albertgator albertgator 9752 Jan  1 12:00 notes.txt
The output of the ls -l command includes the following information:
- The file permissions
- The number of links to the file
- The owner of the file
- The group owner of the file
- The size of the file in bytes
- The last modification time
- The name of the file
The ls -l command displays the size of directories as 0. This is because the size of a directory is not the sum of the sizes of the files it contains, but rather the size of the metadata that describes the directory. This comes from the fact that directories are just special files that contain a list of filenames and their corresponding references to the actual file data (called inodes).
To calculate the size of a directory and its contents, you can use the du (disk usage) command.
Changing Directories
You can use the cd command to change directories. For example, to change to the images directory from ~/ (the home directory), you can use the following command:
$ pwd
/home/albertgator

$ cd ./images

$ pwd
/home/albertgator/images
We could have also specified the full path and ran cd ~/images to achieve the same result.
The . (dot) and .. (dot-dot) directories are special directories found in every directory. The . directory refers to the current directory, while the .. directory refers to its parent directory.
For example, if you are in the images directory and you want to change to the parent directory, you can use the cd .. command:
$ pwd
/home/albertgator/images

$ cd ..

$ pwd
/home/albertgator
Working with Files and Directories
Creating Files and Directories
You can use the touch command to create an empty file. To create a file called hello.txt, you can use the following command:
$ touch hello.txt

$ ls
abc.txt  hello.txt  images  notes.txt
Directories can be created using the mkdir command. To create a directory called stuff, you can use the following command:
$ mkdir stuff

$ ls
abc.txt  hello.txt  images  notes.txt  stuff
If a filename contains spaces, you can escape the spaces using a backslash (\) or enclose the filename in quotes ("). For example, to create a file called my file.txt, you can use either of the following commands:
$ touch my\ file.txt

$ touch "my file.txt"
Moving and Renaming Files and Directories
You can use the mv command to move files and directories. To move the newly created hello.txt file to the stuff directory, you can use the following command:
$ mv hello.txt stuff/

$ ls stuff
hello.txt
You can also use the mv command to rename files and directories. To rename the hello.txt file to hi.txt, you can use the following command:
$ mv stuff/hello.txt stuff/hi.txt

$ ls stuff
hi.txt
Copying Files and Directories
You can use the cp command to copy files and directories to a new location. Directories can be copied recursively using the -r (recursive) option. Let's make a copy of our notes and images.
$ cp notes.txt notes-copy.txt

$ cp -r images images-copy

$ ls
abc.txt  images  images-copy  notes-copy.txt  notes.txt  stuff
Moving or copying a file to a location where a file (/directory) with the same name already exists will overwrite the existing file, potentially leading to data loss!
To avoid overwriting files, you can use the -i (interactive) option with the mv and cp commands. This will prompt you to confirm before overwriting an existing file. For example:
$ cp -i notes.txt stuff/hi.txt
overwrite 'stuff/hi.txt'? (y/n [n]) n
not overwritten
Removing Files and Directories
You can use the rm command to remove files and directories. Note that directories must be empty before they can be removed (unless you use the -r option to remove it and its contents recursively). Let's remove the notes-copy.txt file and the images-copy and stuff directories:
$ rm notes-copy.txt

$ rm -r images-copy stuff

$ ls
abc.txt  images  notes.txt
The rm command permanently deletes files and directories, and there is no way to recover them once they have been removed. Be careful when using the rm command, especially with the -r option, as it can delete large amounts of data in a single command.
Viewing and Editing Files
Viewing File Contents
You can use the cat command to catenate and display the full contents of a file. For example, to display the contents of the abc.txt file, you can use the following command:
$ cat abc.txt

Hello, World!
If you want to view the contents of a file one page at a time, you can use the less command. For example, to view the contents of the notes.txt file, you can use the following command:
$ less notes.txt

This is a long file that requires more than one page to display. You can use the arrow keys to navigate up and down, and the `q` key to quit.

Lorem ipsum dolor sit amet, consectetur adipiscing elit. Sed non risus. Suspendisse lectus tortor, dignissim sit amet, adipiscing nec, ultricies sed, dolor. Cras elementum ultrices diam. Maecenas ligula massa, varius a, semper congue, euismod non, mi.

...
Editing Files
nano, vim, and emacs are popular text editors that you can use to create and edit files from the command line. nano is a simple and easy-to-use text editor that is great for beginners. To create a new file called newfile.txt using nano, you can use the following command:
$ nano newfile.txt
This will open the nano text editor, where you can type and edit text. To save the changes and exit nano, you can press Ctrl + O to write the file to disk, and Ctrl + X to exit the editor.
For more advanced text editing features, you can use vim or emacs. These editors have a steeper learning curve but provide powerful features for editing text files. See Vim vs. Nano vs. Emacs: Three sysadmins weigh in for a comparison of these editors and links to resources for learning them.
Redirection and Pipes
By now you may have noticed that command line programs receive and produce input and output from
standard sources. By default, the standard input (stdin) is the keyboard, and the standard output
(stdout) is the terminal. You can use redirection and pipes to control where the input and output of commands go. This allows you to chain commands together and create powerful command pipelines.
In this section we're going to cover:
- Input Redirection (from File) using
< - Output Redirection (to File) using
>&>> - Piping using
|
For more information refer to Piping and Redirection! - Keeping the data flowing.
Input Redirection
Using the left-caret (<) we can feed a program's stdin with a file's content's. For example, we can determine the number of lines in a log file by directing it to the wc command with flag -l (count lines).
$ wc -l < emails.log
     825
Input redirection is especailly useful when programs don't expect or provide an argument for an input file. In the example above, wc received data (the contents of emails.log), but has no knowledge of where it came from. Normally, wc takes a file as a parameter and will print out the name of the file along with the results of the operation.
Redirection, in general, allows us to anonymously redirect streams to/from files.
Output Redirection
Using the right-caret (>) we can feed a program's stdout to a file. This operation is similar to the mv command in that it will overwrite the file (completely; as in to replace) that the output stream is being redirected to.
Suppose a client named Sam wanted to know if emails had been sent to him from an automated system of ours. We could provide Sam with the lines of the emails.log file that contains the pattern "sam".
$ grep "sam" < emails.log > sam_i_am.txt
$ cat sam_i_am.txt
Sent email to Samir Montova ([email protected])
Sent email to Samir Jihad ([email protected])
Sent email to Drake Ramsamooj ([email protected])
Sent email to Samuel Morse ([email protected])
Sent email to Samuel Koski ([email protected])
Sent email to Samuel Longs ([email protected])
In this example we directed the emails.log file as input for grep (see its manual for more info) which outputted lines matching the pattern "sam". This output was then redirected to the file sam_i_am.txt.
Using the double-right-carets (>>) we instead append to a file from stdout.
$ grep "sam" < emails.log > special_people.txt
$ grep "rob" < emails.log >> special_people.txt
Sent email to Samir Montova ([email protected])
Sent email to Samir Jihad ([email protected])
Sent email to Drake Ramsamooj ([email protected])
Sent email to Samuel Morse ([email protected])
Sent email to Samuel Koski ([email protected])
Sent email to Samuel Longs ([email protected])
Sent email to Vlad Groberg ([email protected])
Sent email to Robert Medina ([email protected])
Sent email to Justin Robinson ([email protected])
Piping
So far we have dealt with direction of data to and from progams and files, but not between programs. Pipes provide a mechanism for directing the output of one program to the input of another. Using the vertical bar character we chain/pipe together as many programs as we like.
$ ls -l | wc -l
      28
The above command line takes the directory listing in long format and then counts the number of lines. This gives us the number of files and directories in our current working directory.
Verion Control & Git
Introduction
Version control is the practice of tracking and managing changes to code and other files. Version control systems (VCS) allow you to track changes to your codebase, collaborate with others, and manage your code history. Git is one of the most popular version control systems used in the software development industry.
The following section provides a brief overview of the fundamental concepts of Git. For a more in-depth understanding of Git, we recommend reading the the "Pro Git" book, written by Scott Chacon and Ben Straub. This book is free and available online here: Pro Git.
For a hands-on course on Git, try out Git by Bit!
Initializing a Git Repository
To start using Git in a project, you need to initialize a Git repository. You can use the git init <directory> command to initialize a new Git repository. For example, to initialize a Git repository in the myproject directory, you can use the following command:
$ git init myproject
Initialized empty Git repository in /home/albertgator/myproject/.git/
.git DirectoryThe .git directory stores all the infomation about the Git repository, including the commit history, branches, and configuration settings. You can check if a directory is a Git repository by looking for the .git directory by running ls -a (to show hidden files) in the directory.
You should not modify the contents of the .git directory manually, as it can lead to corruption of the repository.
Cloning a Git Repository
If you want to work on an existing Git repository (e.g., a project hosted on GitHub), you can use the git clone <repository-url> [<directory>] command to clone the repository to your local machine. For example, to clone a repository from GitHub, you can use the following command:
$ git clone https://github.com/micaheljordan/BallGame.git
This will clone the repository into a directory with the same name as the repository (in this case, BallGame). You can also specify a different directory name to clone the repository into by providing the directory name as an argument to the git clone command.
Checking the Status of the Repository
You can use the git status command to check the status of the repository. The git status command shows you:
- which branch you are on,
- which tracked files have been modified,
- which untracked files (defined below) are in the working directory, and
- which files are staged for commit.
$ git status
On branch mvp
Your branch is up to date with 'origin/mvp'.

Changes to be committed:
  (use "git restore --staged <file>..." to unstage)
	modified:   Cargo.lock
	modified:   Cargo.toml

Changes not staged for commit:
  (use "git add <file>..." to update what will be committed)
  (use "git restore <file>..." to discard changes in working directory)
	modified:   src/cli.rs
	modified:   src/gradescope/types.rs
	modified:   src/main.rs

Untracked files:
  (use "git add <file>..." to include in what will be committed)
	new_file.txt
When you add a file to the staging area, Git starts tracking changes to that file. This means that Git will keep track of the changes made to the file and allow you to commit those changes to the repository.
Viewing the Commit History
You can use the git log command to view the commit history of the repository. The git log command shows you:
$ git log
commit 088a0a (HEAD -> master, origin/master, origin fall-2024-fixes, origin/HEAD)
Author: Robert Conde <[email protected]>
Date:   Wed Nov 6 11:06:33 2024 -0500

    A2: Make verbose and safely compare (Ex2 & EC)

commit 14bba4
Author: Robert Conde <[email protected]>
Date:   Wed Nov 6 10:52:08 2024 -0500

    A4: Make Ex3 verify vars clear

commit b58117
Author: Robert Conde <[email protected]>
Date:   Wed Nov 6 10:26:13 2024 -0500

    A4: Remove duplicate line in Ex1

commit dac64a
Author: Robert Conde <[email protected]>
Date:   Mon Oct 7 01:13:10 2024 -0400

    🐶 Rufus
Making Changes

Git uses a three/four-stage workflow to manage changes to your codebase. The stages are:
- Working Directory: The directory where you make changes to your code.
- Staging Area: The area where you prepare changes to be committed. Changes made in the working directory can be added to the staging area.
- Repository: The repository where changes are committed and stored.
- Remote Repository: A remote repository where changes can be pushed and pulled from.
Staging Changes
You can use the git add <file> command to add changes made to a file in the working directory to the staging area. For example, to add changes made to a file named Player.cpp to the staging area, you can use the following command:
$ git add src/Player.cpp
You can unstaged changes by using the git restore --staged <file> command. For example, to unstage changes made to the Player.cpp file, you can use the following command:
$ git restore --staged src/Player.cpp
git add .The git add . command adds all changes in the working directory to the staging area. Be careful when using this command, as it can add unwanted changes to the staging area.
Committing Changes
You can use the git commit -m "<message>" command to commit changes in the staging area to the repository. For example, to commit the changes in the staging area with the message "Add Player name validation", you can use the following command:
$ git commit -m "Add Player name validation"
When writing commit messages, it is important to provide a clear and concise description of the changes being committed. A good commit message should explain what changes were made and why they were made.
Here are some good commit message examples:
Add Player name validationUpdate README with installation instructionsFix issue with player movement when jumping
Commit messages should be written in the imperative mood (e.g., "Add", "Update", "Fix") because they describe what the commit will do when applied to the codebase.
Pushing Changes
You can use the git push [<remote>] [<branch>] command to push changes from the local repository to a remote repository. For example, to push changes from the main branch to the origin remote repository (this is the name of the default remote repository), you can use the following command:
$ git push origin main
Without specifying a remote or branch, the git push command will push changes from the current branch to the remote repository. So if you repo's working directory is on the main branch, you can simply use git push.
When pushing changes to a remote repository, you may encounter conflicts if the remote repository has been updated since your last push. Git will notify you of any conflicts and provide instructions on how to resolve them.
We will cover conflict resolution in more detail at a later time.